Party Booking Training Guide

Step 1: Create your member account for the Admin
- Select Login
- Select Sign up to LSS, fill in information
Step 2: Setup your Subscription to Party Booking
- From the Home Page, select Pricing then 'Sign Up Now' under Party Booking
- Select Next
- In the box under CREATE A NEW ONE, Enter Your Business Name
- Select Create
- Select Next
- Enter your Card information for billing, then select Sign up
Step 3: Adding Members
- Make sure you are logged in, if you are not, Login at the top right
- Under Dashboard, select Members
- Enter a standard email that all staff members can use to login to all computers at your store, click Add
Step 4: Set up & Build your Personalized Party Site
Billing
This is how customers will pay for their parties.
- Under Dashboard, Select Setup then Billing
- Connect with Stripe (Preferred) — This is how your guests will pay via VISA, Mastercard, American Express & Discover.
- Follow the steps to set-up
- Select Billing
- Connect with PayPal (Optional) — Must be a Business PayPal Account.
- Follow the steps to set-up
*Note: You will not be able to accept any type of Deposit payment if you do not activate one of the billing options*
Service
Setting up your business profile within the party booking site.
- Under Dashboard, Select Setup then Service
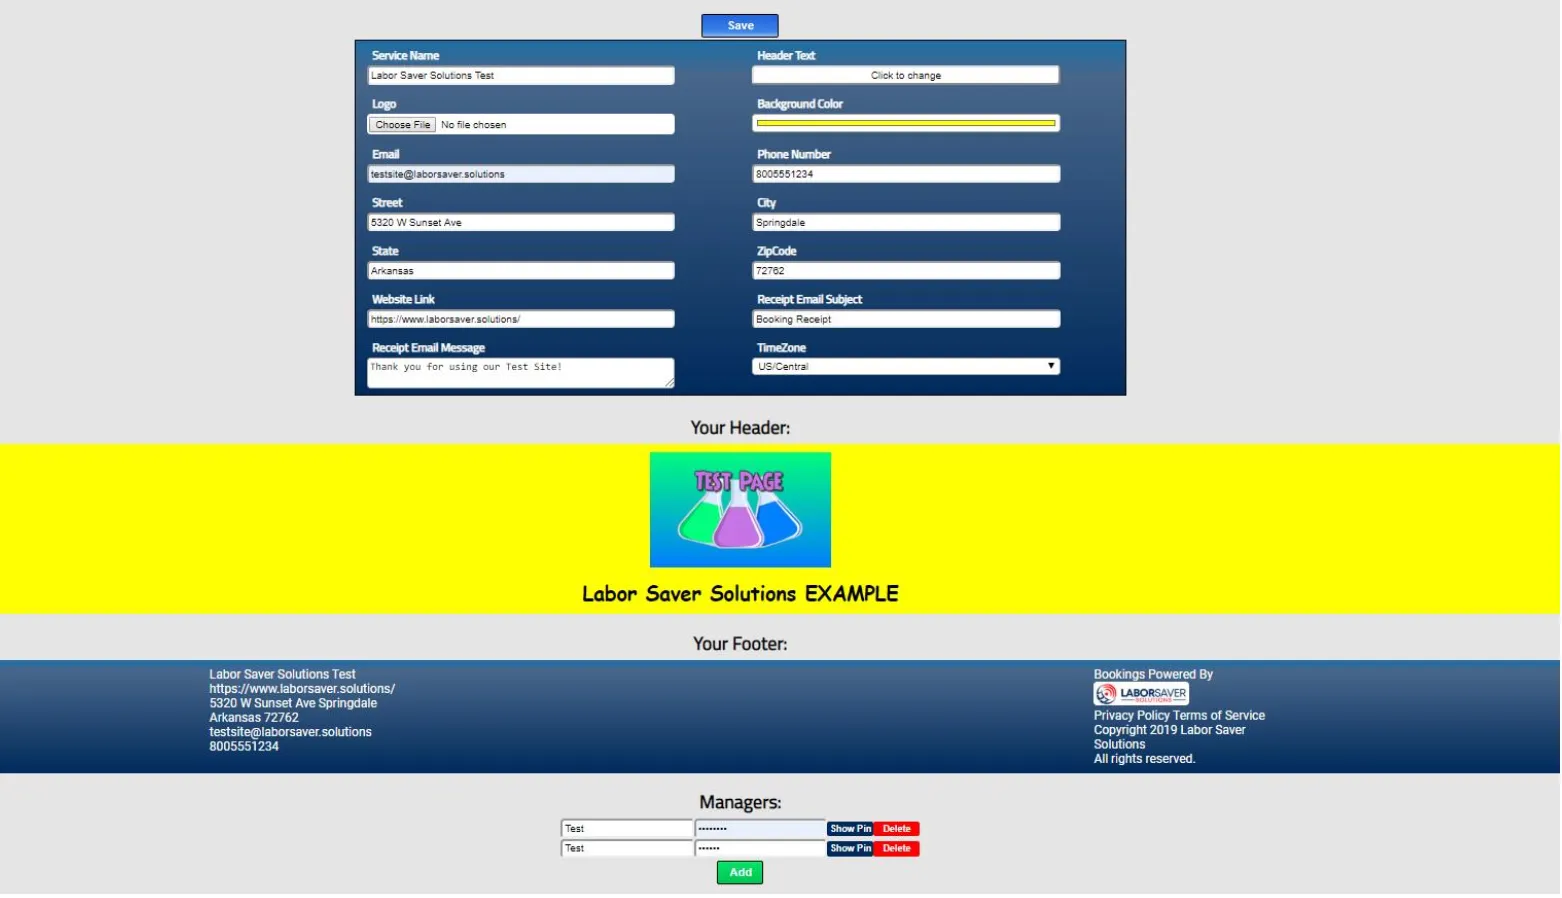
- Service Name — The name that appears on customer receipts and the page footer.
- Logo — This changes the main logo that appears in the header and on email receipts.
- Header Text — This changes the text that appears below your header image.
- Background Color — This is the main background color of the business.
- Email — This is the email that will appear on customer receipts and the page footer.
- Phone Number — This is the phone number that will appear on customer receipts and the page footer.
- Address — This is the full address that will appear on customer receipts and the page footer.
- Website Link — This is the link that will appear on customer receipts and the page footer. (Must include http://yourbusinessname.com)
- Receipt Email Subject — The subject line of your booking receipts emailed to customers.
- Receipt Email Message — The custom message that will appear at the top of receipts emailed to customers.
- TimeZone — The time zone used for all events booked and internal report running.
Add Managers
Allows managers to override party information.
- Under Your Footer, Click Add
- Enter the unique name assigned to the pin to identify manager overrides.
- Enter the manager pin used to override parts of event bookings, ideal for a 4-digit PIN.
Example of how your Service Page will look:
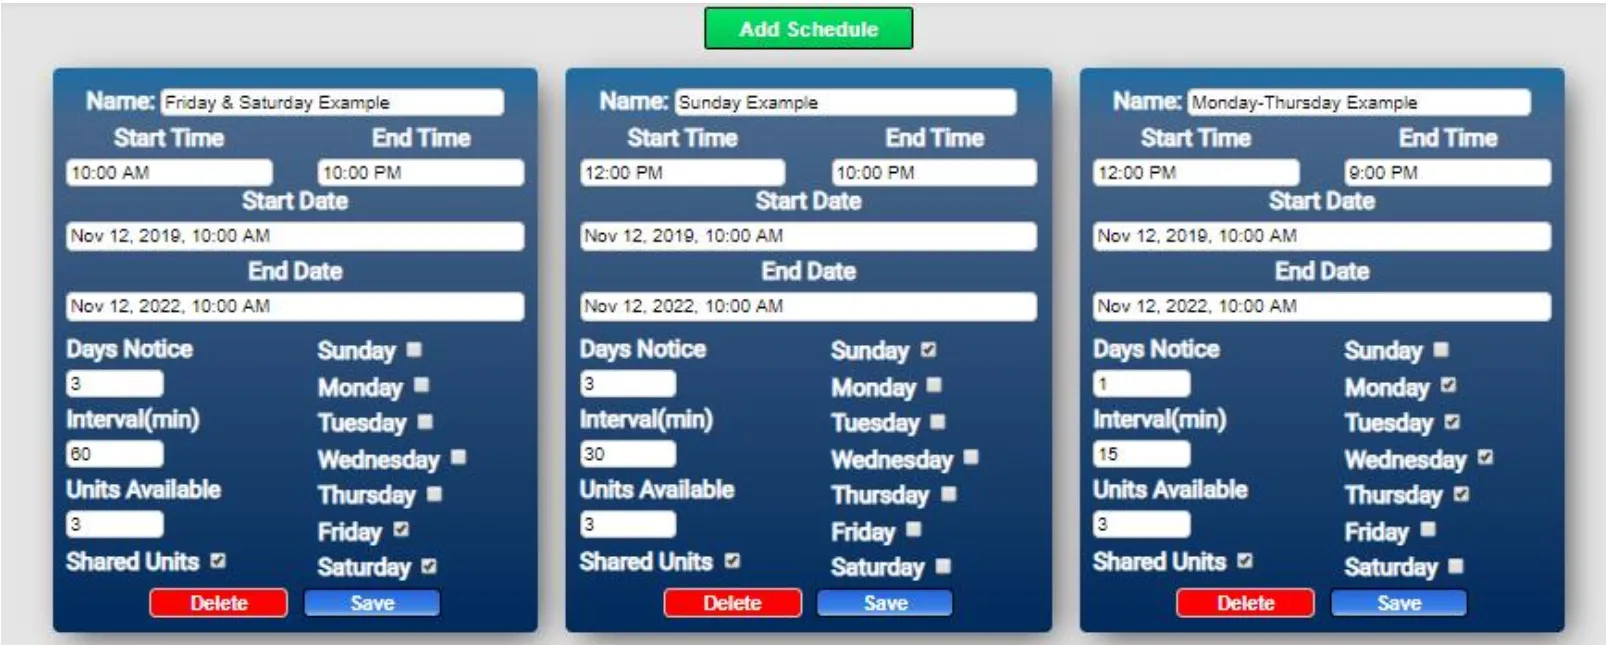
Schedules
- Under Dashboard, Select Setup then Schedules
- Name — This is the internal name for your schedule depending on your party time availability each day of the week (Ex: Monday-Thursday Party Booking).
- Start Time — The time of the first slot available for booking.
- End Time — Your business closing time, no event can be booked if it lasts beyond this time.
- Start Date — The date and time each specific schedule goes live allowing customers to book.
- End Date — The date and time each specific schedule ends disallowing customers to book.
- Days Notice — The number of days in advance an event must be booked.
- Interval — Determines how often time slots are created for booking from the start time.
- Units Available — This is the number of units available to book within each specific schedule.
- Shared Units — This determines if each specific schedule shares available units with other schedules. If checked, an event booked on one schedule will take away slots from events attached to specific schedules that are checked.
- Select the days of the week for your specific schedule to book events.
- Hit Save
*You will create a schedule for each day your hours or party times vary — Ex: Monday-Thursday 10-9 and Friday-Sunday, 10-10 will require 2 different schedules for the variance of hours*
Example of how your Schedules will look:
Blocks
Blocking off specific dates/times for holidays, events, etc…
- Under Dashboard, Select Setup then Blocks
- Title — Enter the name of your Block time (Ex: Thanksgiving Closed)
- Start Date-End Date — This is the day(s) you need to block off your party room(s)
- Select Add Block
Example of how your Blocks will look:

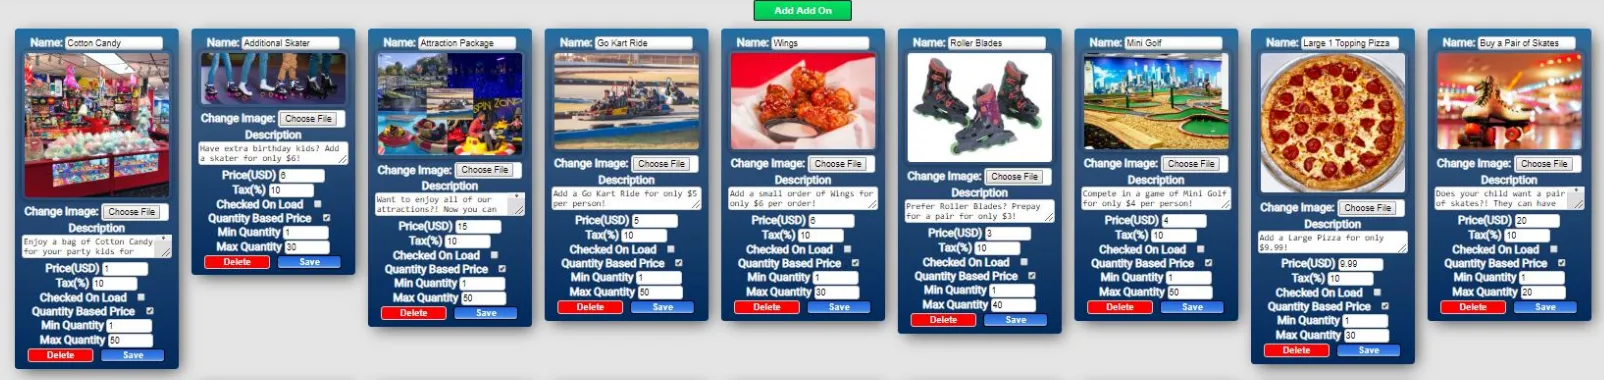
Add-ons
Setting up add-ons for customers to purchase in advance at time of booking!
- Under Dashboard, Select Setup then Add Ons
- Select Add Add-on
- New Add On — This is the name that will appear for your add-on within the party booking form.
- Choose Image — This is the picture that will display on your add-on.
- Description — Describe the add-on to upsell to your guest.
- Price — The price in USD that your add-on will be.
- Tax — The tax percentage applied to your add-on (based on taxes in your state).
- Checked on Load — This determines if the add-on is added to the customers cart by default when it is loaded.
- Quantity Based Price — This determines if the price is multiplied by the quantity chosen or if the price is static.
- Min Quantity — The minimum quantity allowed for purchase.
- Max Quantity — The maximum quantity allowed for purchase.
- Select Save
*You can add as many add-ons as you would like for your guests to be able to choose from.
Example of how your Add-Ons will look:
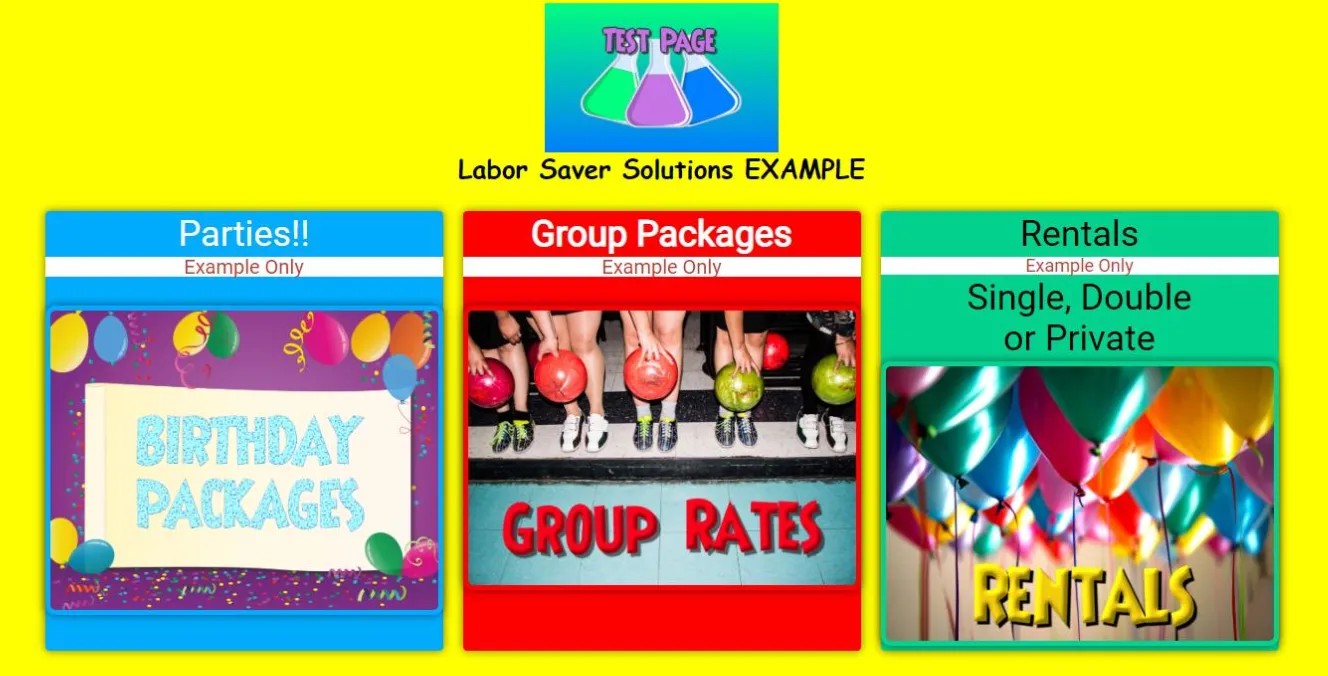
Build
This is the fun part of building your party packages & forms!!
- Under Dashboard, Select Setup then Build
- The first page is the Tree/Menu page — This is where you will begin creating your Packages that you offer, such as Party & Group.
- Select Add Menu — A new menu bar should populate.
- Select New Menu — You will start creating menus for your Main options first (Ex: Birthday Party Packages and Group Packages) then we will create the specific party package menus under these menus, creating a Tree of your options.
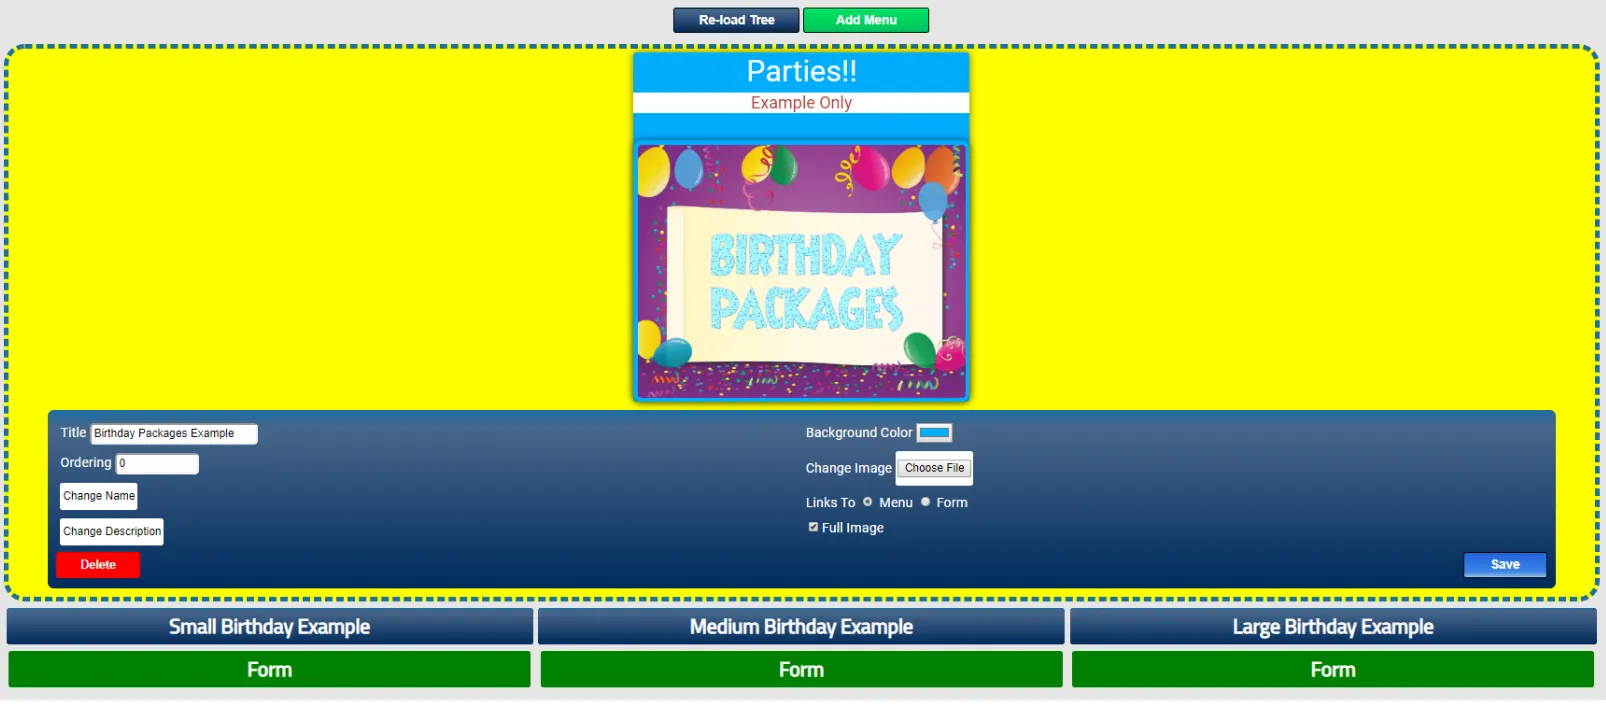
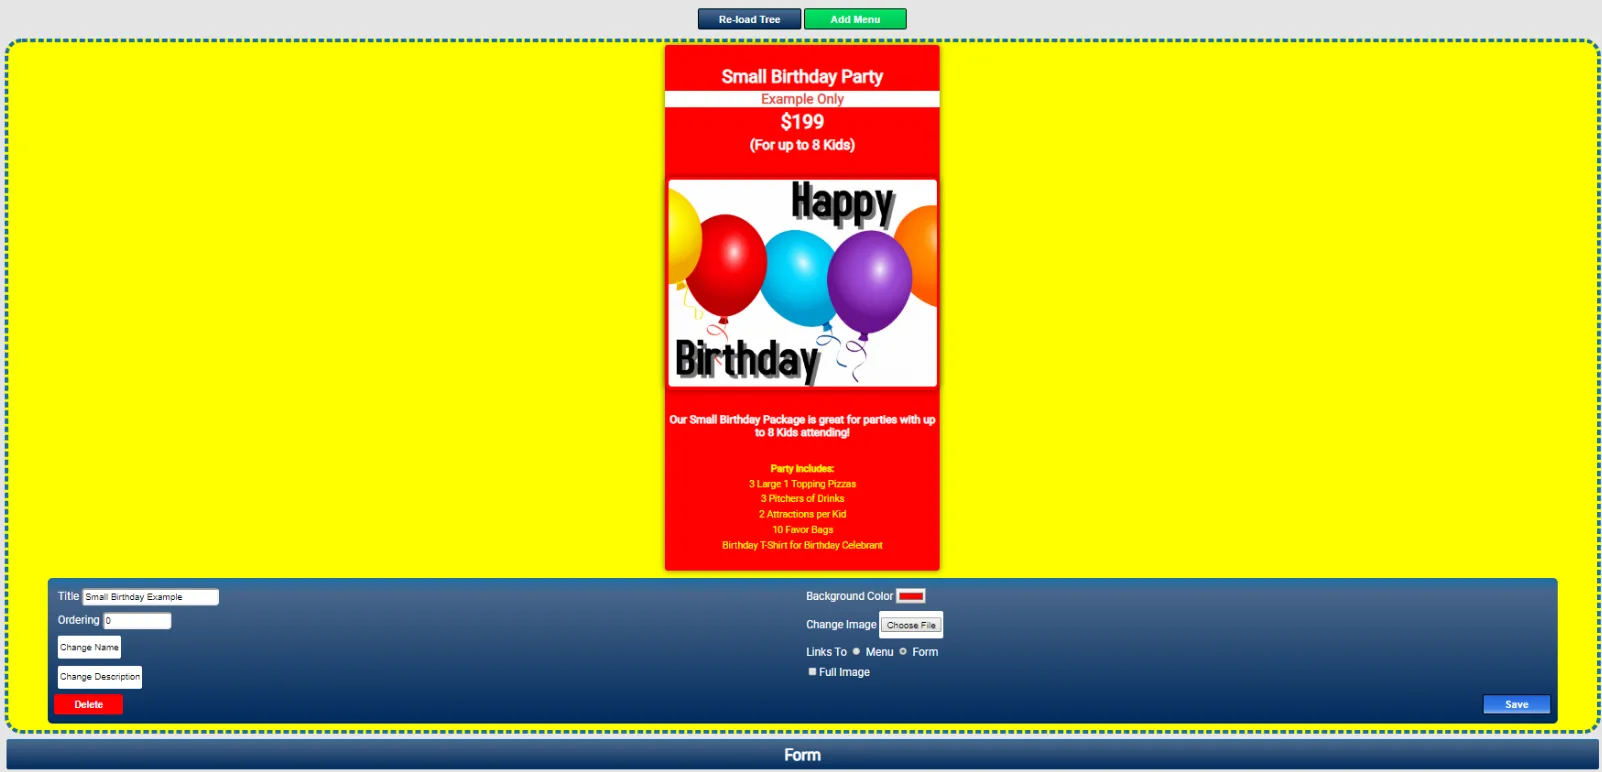
You will begin setting up your menu within the blue section of this menu:
- Title — This is the title used for internal tracking and reports. We recommend keeping this short & basic (Ex: Birthday Party Packages or Room Rentals).
- Ordering — This is the order for how the menus will appear to customers, with 0 being the first menu and going up in numerical order.
- Change Name — This is the visual name that will appear on the menu, you can edit this to the font, color, etc… that you like.
- Description — This is a description of your Menu (Ex: Celebrate your special day with one of our party packages. Every package includes: Pizza, drinks and a party captain).
- Background Color — This is the background for the specific menu you are creating.
- Image — This is the image that displays for each specific package.
- Links To Menu or Form — This determines whether each specific menu links to more menus, or directly to a form. Linking to a menu allows you to create another menu item (Ex: Your specific party packages). Linking to a Form takes the guest to the booking page directly from the menu.
- Full Image Box — This determines if the description will show or just the image will show (Ex: You would check this box when you do not feel a description is needed).
*You will continue to build additional Packages following the steps above (Birthday, Group, etc…)*
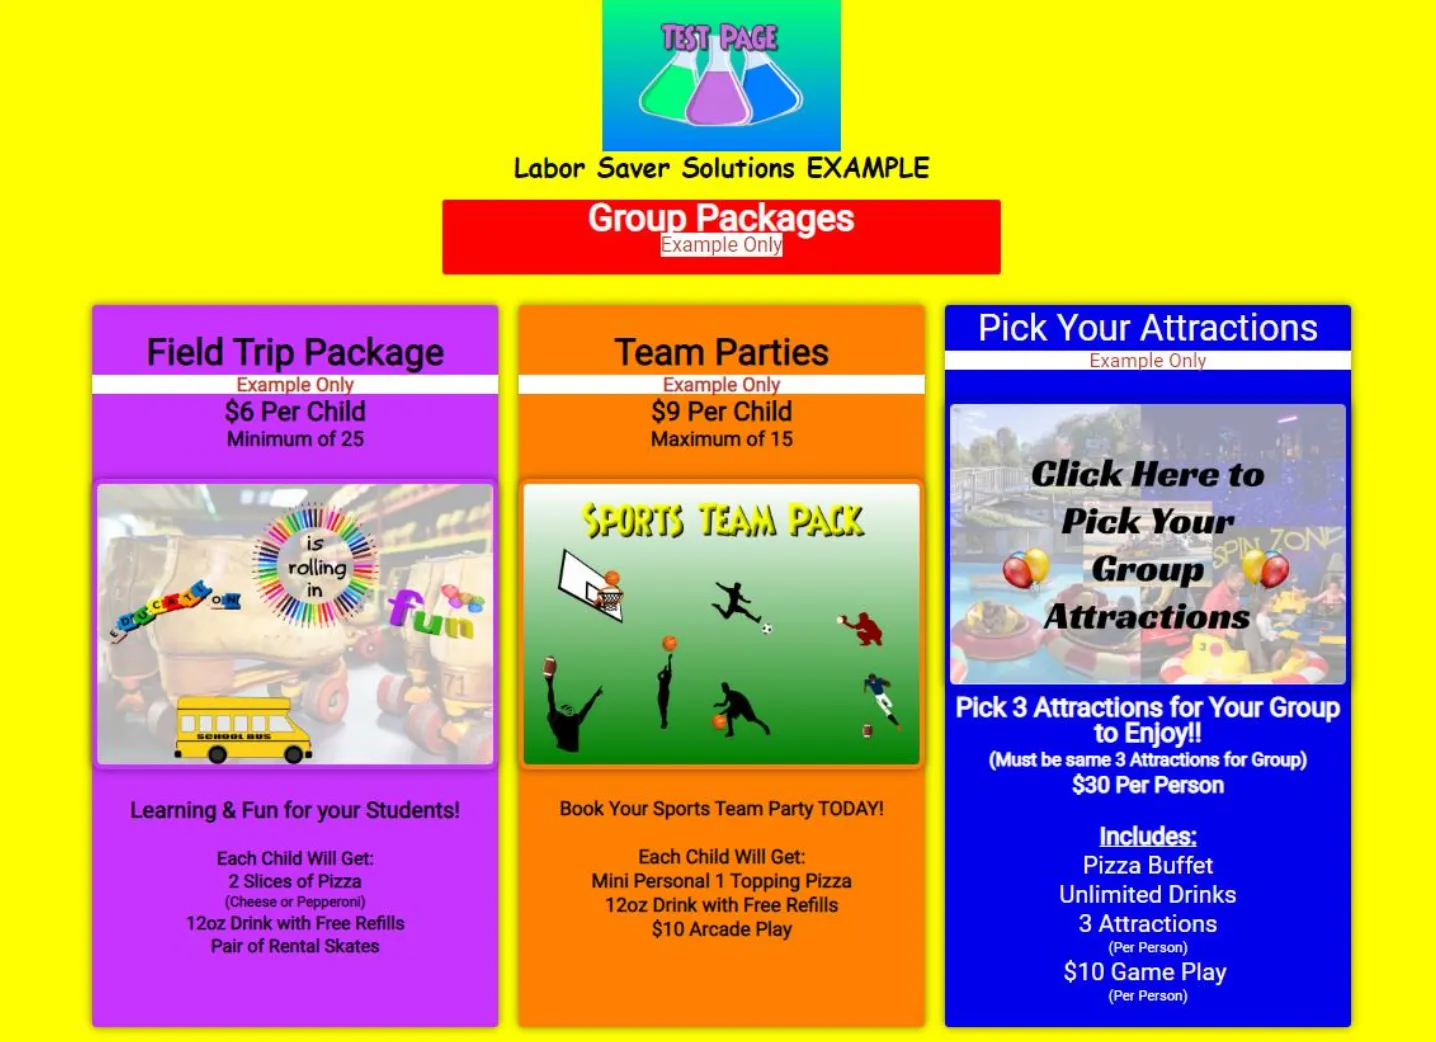
Here is an example of how your Main Package Page will look:
Creating Specific Party Package Menus
Now that you have created your first Package, you're ready to create menus for your specific party packages!
- Select on the Menu that you just created (Ex: Birthday Party Packages)
- Select Add Menu
- Select New Menu — This will be the Menu to create your first specific Party Package! You will begin setting up your menu within the blue section of this menu.
- Title — This is the title used for internal tracking and reports. We recommend keeping this short & basic (Ex: Fun Party Pack).
- Ordering — This is the order for how the menus will appear to customers, with 0 being the first menu and going up in numerical order.
- Change Name — This is the visual name that will appear on the menu, you can edit this to the font, color, etc… that you like.
- Description — This is a description of your Menu (Ex: Celebrate your special day with one of our party packages. Every package includes: Pizza, drinks and a party captain).
- Background Color — This is the background for the specific menu you are creating.
- Image — This is the image that displays for each specific package.
- Links To Menu or Form — You will link to a Form so when your guest clicks on your image, it takes them directly to the form to book the party. Linking to a menu allows you to create another menu item (Ex: Your specific party packages). Linking to a Form takes the guest to the booking page directly from the menu.
- Full Image Box — This determines if the description will show or just the image will show (Ex: You would check this box when you do not feel a description is needed).
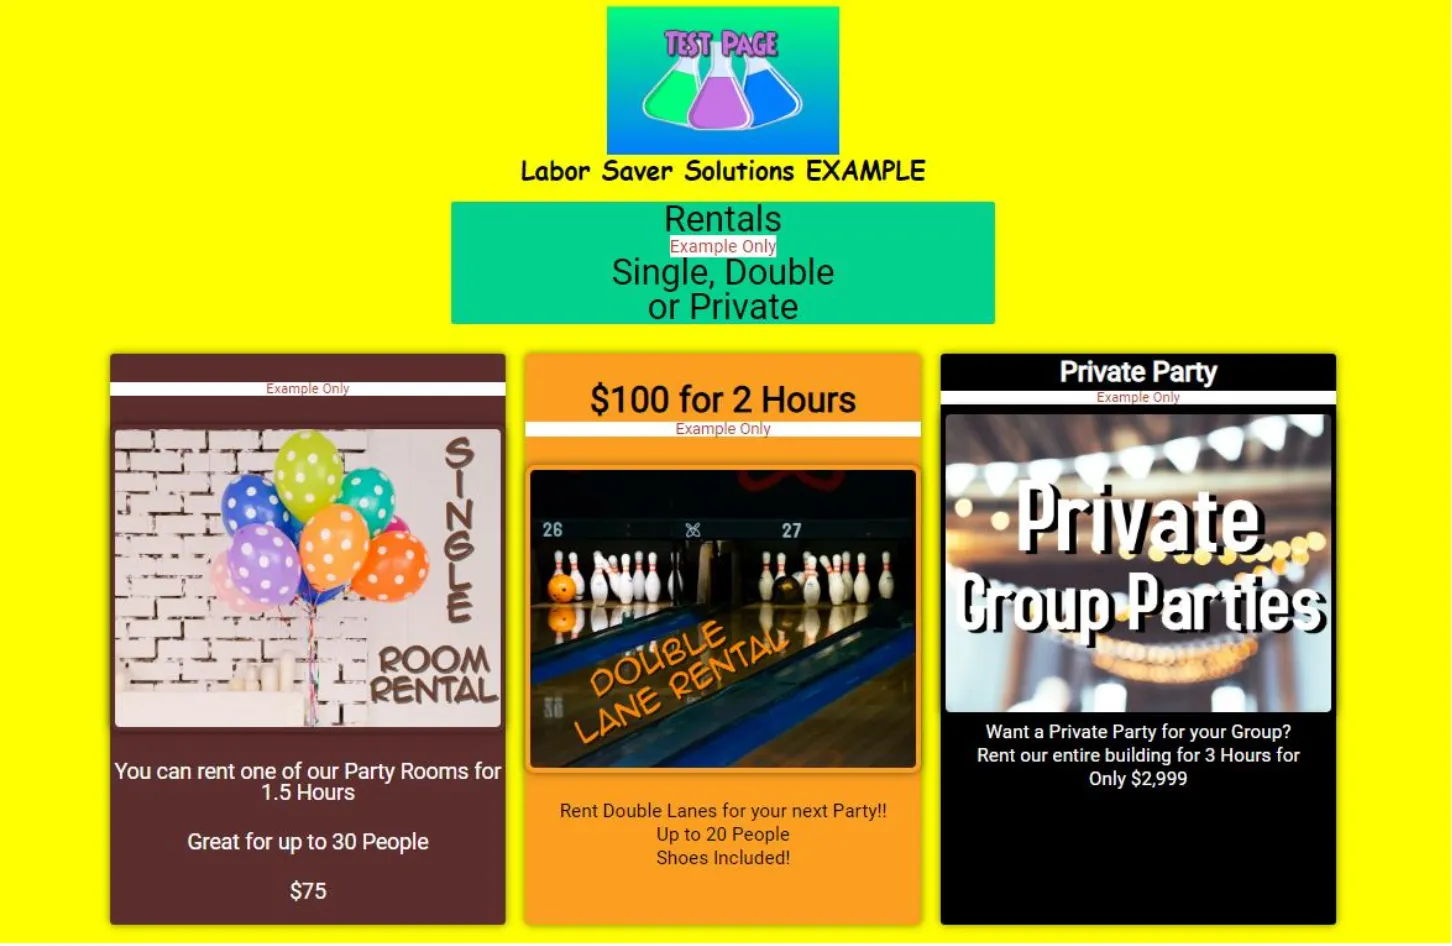
Example of Party Package Menus:
Example of how your Specific Party Packages will look:
Creating the Booking Form
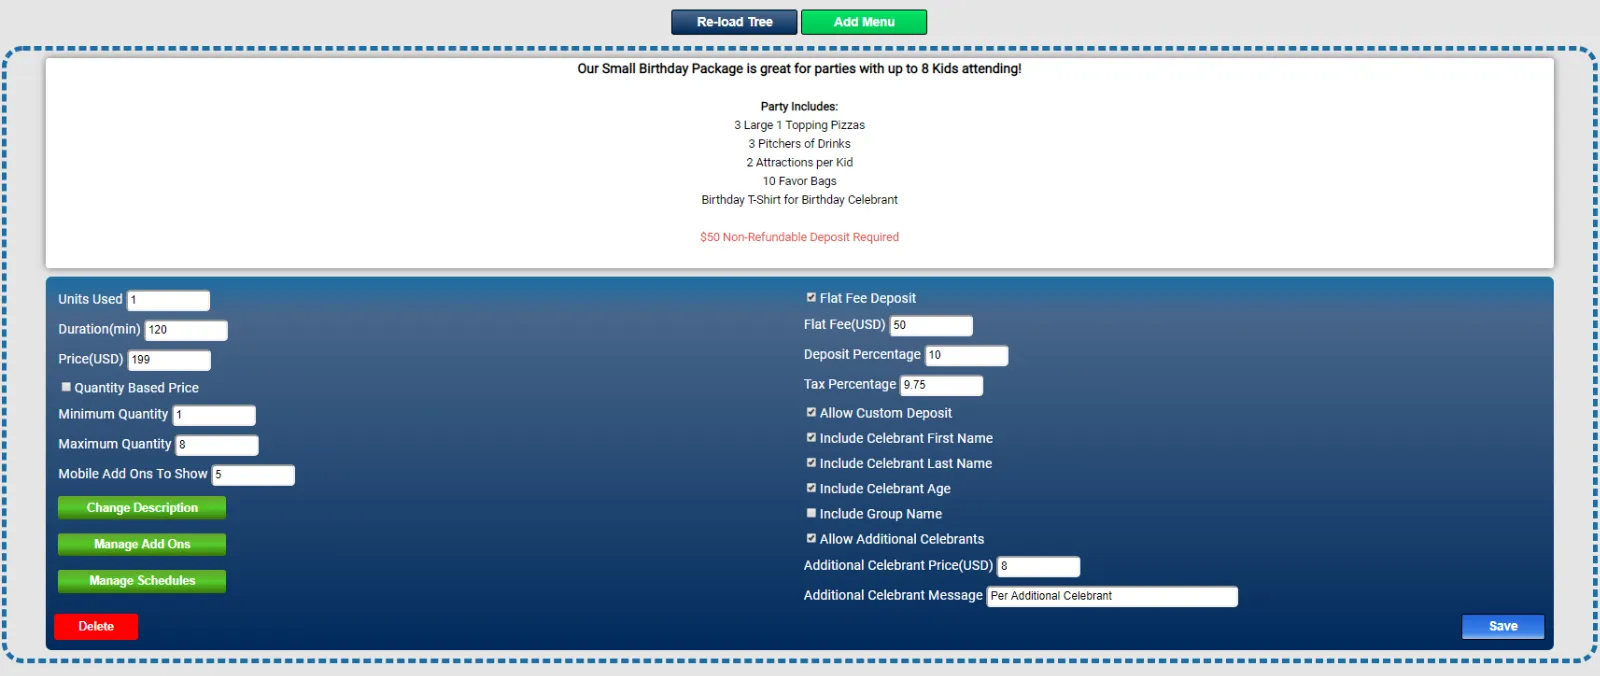
Now that you have linked this Menu to a Form, you will click the bar that populated at the bottom of the page that says Form. We will now begin creating your Form for your guests to Book a Party!
- Units Used — This determines how many units are used up from a schedule when booked.
- Duration (min) — This is the duration of the event used for deciding if subsequent slots are available.
- Price — This is the base price of the event.
- Quantity Based Price — This determines if the base price is static or dependent on the number of people.
- Minimum Quantity — This is the minimum quantity allowed if Quantity Based Price is enabled.
- Maximum Quantity — This is the maximum quantity allowed if Quantity Based Price is enabled.
- Mobile Add-Ons To Show — This is how many add-ons to show when viewing on a mobile device.
- Description — You click this to change the description on the form (at the top of the page).
- Manage Add-Ons — You will click this to change the add-ons associated with this form and their order they appear.
- Manage Schedules — You will click this to change the schedules associated with this form and their order they appear.
- Flat Fee Deposit — This determines if the deposit is a static fee or a Percentage Based Fee.
- Flat Fee — The deposit static fee used if the Flat Fee Deposit box is checked.
- Deposit Percentage — The deposit percentage taken if Flat Fee Deposit is NOT checked.
- Tax Percentage — The tax percentage applied to the base package total.
- Allow Customer Deposit — If checked, it allows the customer to pay a customer deposit between the minimum deposit set and the full price.
- Include Celebrant First Name — If checked, it requires a celebrant first name to be entered.
- Include Celebrant Last Name — If checked, it requires a celebrant last name to be entered.
- Include Celebrant Age — If checked, it requires a celebrant age to be entered.
- Include Group Name — If checked, it requires a group name to be entered.
- Allow Additional Celebrants — This determines if you want additional celebrants to be allowed (Ex: Booking a party for twins).
- Additional Celebrant Price — This is the price required for additional celebrants, if allowed.
- Additional Celebrant Message — This is the message for additional celebrants, if allowed (Ex: Per Additional Celebrant).
- Click Save
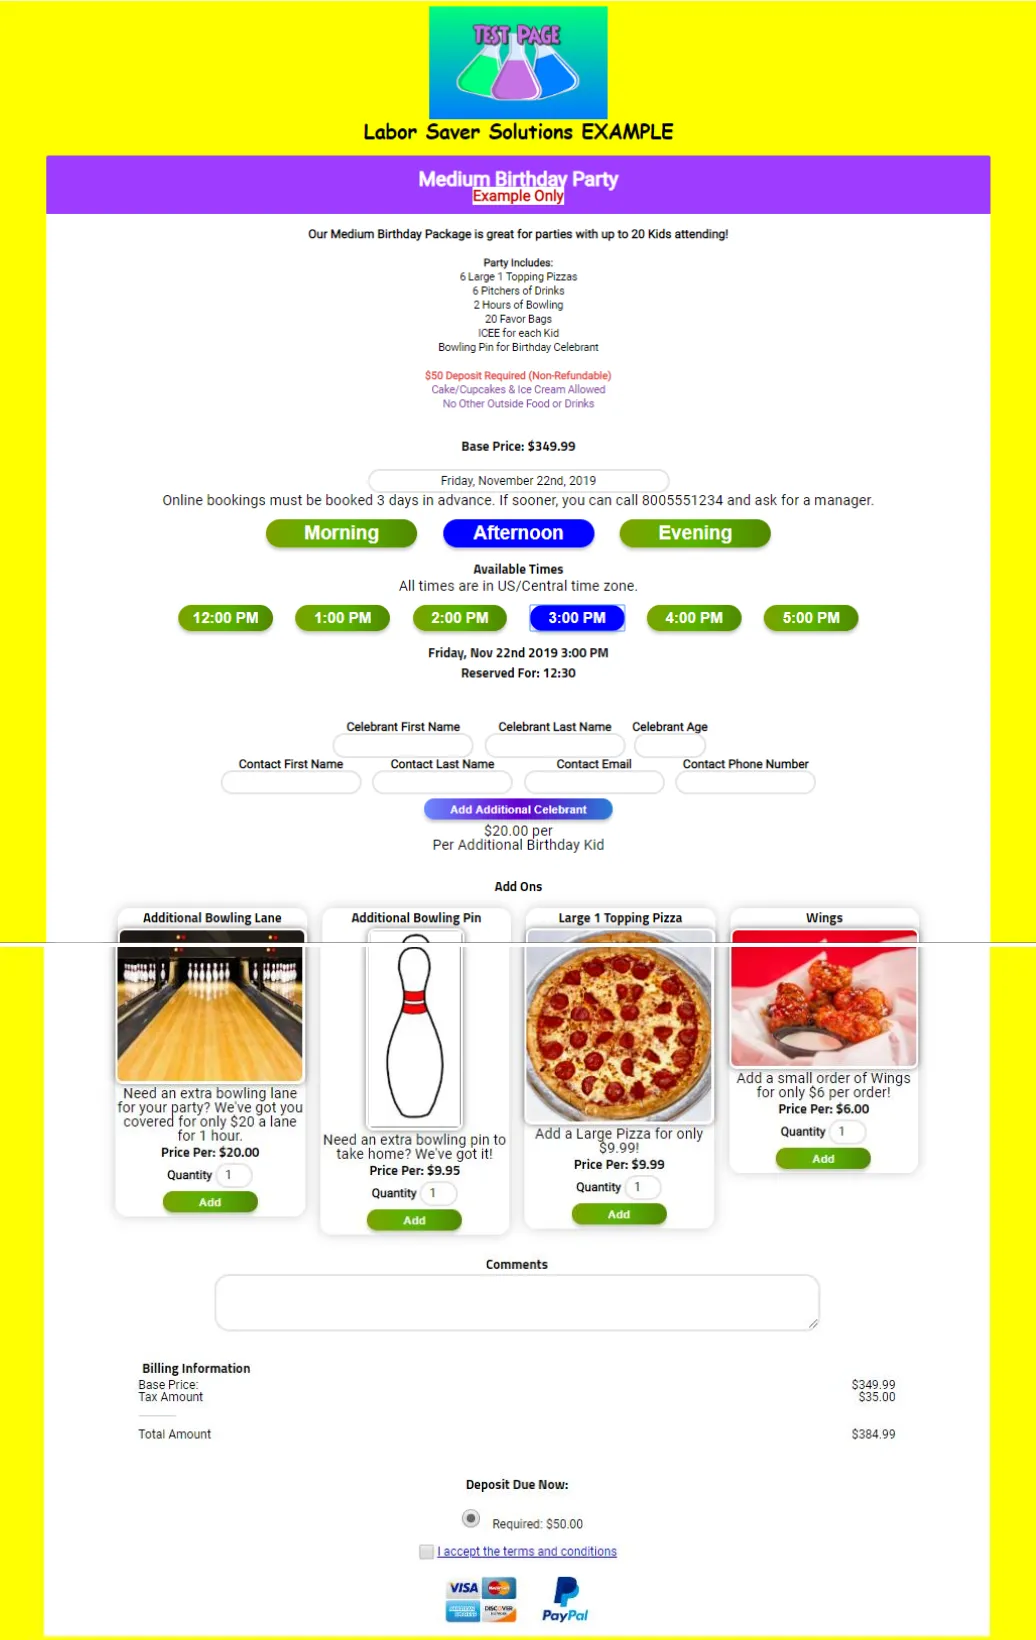
Example of how your Form will look:
Example of how your Package Tree will look:

Congratulations!! You have now created your Party Booking Pages and are ready for your customers to start Booking!!
*See Below for Examples of how the Pages will look once uploaded to your Website*
Here are some Examples of how your Party Booking Menus/Forms will look on your Business Website!!